Showing posts with label cards. Show all posts

Sunday, May 15, 2011

Strength & Hope Card Class - Join the Cause and Stamp Out Breast Cancer!

Join the Cause and Stamp Out Breast Cancer!


As part of our Making a Difference program, Stampin' Up! is proud to partner with The Breast Cancer Research Foundation in the Strength & Hope Campaign.

Throughout the 2011 Summer Mini Catalogue sales period, Stampin' Up! will donate $2 from the sale of each Strength & Hope set and Strength & Hope digital kit to The Breast Cancer Research Foundation (BCRF).

I was inspired by this campaign and by friends of mine who are participating in the Walk to End Women’s Cancers in June. In honor of close friends and all women out there, who have battled and are currently battling this disease, I am hosting a fundraiser for the Ottawa Regional Cancer Foundation.


We will make four cards, all using the Strength and Hope stamp set from the Summer Mini Catalogue. Proceeds from this class ($8 from each participant’s fee) will be donated to the Ottawa Regional Cancer Foundation along with 20% of all product purchased at the event.


Class details

When: Monday, May 30th - 7pm to 9pm
Where: My home in Barrhaven (Ottawa, ON)

Cost:
$15 for 4 cards
$30 for 4 cards and includes the Strength & Hope clear stamp
$35 for 4 cards and includes the Strength & Hope wood stamp set
($8 from each participant’s fee will be donated to the ORCF)


Monday, April 25, 2011

2 fun classes...one night!

I have made some changes to my April-May class schedule.  You can view the entire schedule HERE!

Please join us this week for some fun classes!  I am holding 2 classes on the same night.  Pick the Stamp of the Month class  or the Card set & holder classRSVP as soon as possible.  Payment can be sent by email or brought to class. See below for all the details.  Hope you can join us :-)


Stamp of the Month Class - spots still available!

Wednesday, April 27th - 7:30pm-9pm

Each month, a different featured stamp set will be used to make 5 beautiful cards. For the month of April, we will be using the Bold Blossom stamp set. Included is a pack of Brights Glimmer Brads.


COST: Pay $30 for clear-mount* OR $35 for wood mount stamp set & class
Pay $20 for the class only
*If you do not own a clear block, I can order Block C for you at an additional cost of $8.95 + s/h & taxes


Haven’t rsvp’d on time? no problem....come to the class anyway and I will order your stamp set that night!


Accepted methods of payment: Cheque, cash, email transfer or Paypal (a $2.00 fee applies for Paypal).


Card set & holder class (12 cards & portfolio holder) - 2 spots left!
Wednesday, April 27th - 7:30pm-9:30pm


Come stamp 12 beautiful and simple cards (4 of 3 designs)! For an additional $3, make a portfolio holder box to package your cards. What a great mother’s day gift (for you or your mom)!

COST: $30 for 12 cards ; $33 for 12 cards and portfolio holder

If you have any questions or would like to register, please email me at RoxiesPaperCreations@gmail.com


Thursday, February 10, 2011

Nature Walk Top Note Card


There are a lot of cool things about being a Stampin' Up demonstrator, but hands down one of my favourites is the magazine called Stampin' Success that we receive in the mail each month. It is packed full of business tips, and great samples. This card is inspired by one from the February issue of Stampin' Success and features the Nature Walk (W121925/C121997) stamp set from the Occasion Mini catalog.

Did you that the Stampin' Up starter kit is on sale as part of Sale-A-Bration? Right now the kit is 15% off and comes with an extra bundle of free product including the color coach, a simply sent kit, a coordinating simply sent stamp set and the punch of your choice. If you'd like more info about the starter kit special, I'd love to talk to you, so just email or call me.

Stampin' Up Supply List
  • Stamps: Nature Walk (W121925/C121997)
  • Ink: Bashful Blue (105209), Soft Suede (115657) Classic Ink
  • Paper: Bashful Blue (105120), Soft Suede (115318), Very Vanilla (101650)
  • Accessories: SNAIL (104332), Stampin' Dimensionals (104430),Marina Mist 3/8 Taffeta Ribbon (119965), Antique Brads (117273), Mini Glue Dots (103683)
  • Tools: Big Shot Die Cutting System (113439), Top Note Die (113463), Stampin Sponges (101610)
Step by Step Directions
  1. Fold Soft Suede card base in half.
  2. Cut Bashful Blue mat to 4 x 5.25
  3. Cut Top Note out of Very Vanilla using the Big Shot.
  4. Stamp bird cage on mat randomly in Bashful Blue.
  5. Stamp images using Bashful Blue and Soft Suede randomly on the Top Note.
  6. Sponge edges of Top Note with Soft Suede.
  7. Using direct to pad with Bashful Blue, run over top of Top Note.
  8. Attach Top Note to Bashful Blue mat using SNAIL. Affix brad through. Attach to card base with SNAIL.
  9. Tie bow out of ribbon and attach to the card with Mini Glue Dots.
Nature Walk is part of the Botanical Suite which features realistic, natural designs and a warm muted color palette. It's understated and perfect for cards or scrapbook pages! To check out more of this suite contact me to schedule a stamping party in your home or mine!


Tuesday, February 8, 2011

Inked Embossing Technique


This is based on a swap card a friend received at the Leadership Conference a few weeks back. This simple technique creates a new effect with your embossing folders by inking them with a brayer!

Stampin' Up Supply List
  • Stamps: Bring on the Cake (W121899/C121958)
  • Ink: Soft Suede (115657)
  • Paper: Bashful Blue (105120), Very Vanilla (101650), Crumb Cake (120953)
  • Accessories:), SNAIL (104332), Stampin' Dimensionals (104430), Basic Pearls , Marina Mist 3/8 Taffeta Ribbon (119965)
  • Tools: Big Shot Die Cutting System (113439), Vintage Wallpaper Embossing Folder (120175) , Decorative Label Punch (120907), Modern Label Punch (119849), Brayer (102395)
Cardstock Dimensions for this Project
  • Crumb Cake
    • 5.5 x 8.5 for card base
  • Bashful Blue
    • 4 x 5.25 for mat
    • Scrap for mat on greeting
  • Very Vanilla
    • 3.75 x 5 for embossed panel
    • Scrap for greeting
Technique Directions
  1. Using brayer, ink up embossing folder. Be sure to pay attention to which side you are inking. Here, the "flat side" was inked to get the background inked. Also, you want to really ink it up!
  2. Run through the Big Shot as normal and you'll have a fun and funky background.
Finishing Touches
  1. Cut and fold card base in half.
  2. Create ink embossed panel as above. Attach Bashful Blue Taffeta Ribbon as shown.
  3. Adhere embossed panel to Bashful Blue mat with SNAIL and then adhere to card base.
  4. Stamp "birthday wishes" greeting in Soft Suede Classic on Very Vanilla and punch with Decorative Label.
  5. Punch Modern Label out of Bashful Blue and cut in half. Layer on back of Decorative Label with greeting. Attach to card base with Stampin' Dimensionals.
  6. Top off greeting piece with Basic Pearls as shown.

I still have 1 spot left for my stamper's techniques card club starting on February 23rd.  Email me for all the details!


Sunday, February 6, 2011

Punch Bunch is the Hottest Sale-a-bration Set Around!


Since Sale-A-Bration started last week, the Punch Bunch Stamp Set (W121847/C123211) has been the most popular stamp set! All the images in this set, including this adorable Owl and birthday greeting, coordinate with Stampin' Up punches. During Sale-A-Bration, you can earn this set for FREE as a customer or hostess!

Here's the artwork and a couple ideas using the Punch Bunch stamp set:


Check back for more samples using this cute stamp set! 

Or better yet, book a private class for you and your friends and we can make cards using Punch Bunch and the coordinating paper punches.

Email me for available dates :)

Saturday, February 5, 2011

Inlayed Embossing Technique


This is a quick and easy technique that packs a punch – literally and figuratively. With the Big Shot, an Embossing Folder and a punch, you can create backgrounds that wow!

Stampin' Up Supply List
  • Stamps: Valentine's Defined (W121941/C123057)
  • Ink: Real Red (103133)
  • Paper: Whisper White (100730), Real Red (102482), Pink Pirouette (111351), Red Glimmer Paper (121790)
  • Accessories:), SNAIL (104332), Stampin' Dimensionals (104430), Pretty in Pink 1/8 Taffeta Ribbon (119260), Whisper White Organza Ribbon (114319)
  • Tools: Heart to Heart Punch (119881), Pinking Hearts Border Punch (117649), Small Heart Punch (117193), Large Oval Punch (119855), Scallop Oval Punch (119856), Big Shot Die Cutting System (113439), Square Lattice Embossing Folder (119976)
Cardstock Dimensions for this Project
  • Pink Pirouette
    • 5.5 x 8.5 for card base
    • Scrap for punched hearts
  • Whisper White
    • 2 x 5.5 for border punch
    • Scrap for greeting
  • Real Red
    • 5.25 x 4 for mat
  • Glimmer Paper
    • Scrap for scallop oval
Technique Directions
  1. Punch desired shapes and adhere to base randomly using SNAIL. Make sure you get the edges of each punched shape down completely.
  2. Run through the Big Shot using the embossing folder of your choice. The punched shape should now be part of the mat creating a single panel.
Finishing Touches
  1. Cut and fold card base in half.
  2. Create inlaid embossing panel as above.
  3. Using Pinking Hearts Border Punch create border strip with Whisper White cardstock.
  4. Layer ribbon pieces around the back and affix with SNAIL. Attach to embossed layer. Attach to card base.
  5. Stamp greeting in Real Red and punch out with large oval.
  6. Punch scallop oval out of glimmer paper and adhere greeting with SNAIL. Attach to card base with Stampin' Dimensionals.

If you live in the Ottawa area and would like to learn more techniques like this one, I would love to have you join my stamper's technique club.  The next Card Club starts Wednesday, February 23rd at 7:30 pm at my home in Barrhaven. 

Click HERE for more information or Email me for all the details!

Friday, February 4, 2011

Cupcake Frosting Technique


Cupcakes are one of the hottest trends in papercrafting, and the new build a Cupcake punch is perfect for creating these little cuties on your cards and scrapbook pages. One of the best parts of the cupcake is the frosting, so this week's technique will help you step you your cupcakes with a bit of heat embossing.

Stampin' Up Supply List
  • Stamps: So Happy For You (Earn it free during Sale-A-Bration!)
  • Ink:Real Red Classic (103133), Versamark (102283)
  • Paper: Whisper White (100730), Pink Pirouette (111351), Soft Suede (115318), Red Glimmer Paper (121790)
  • Accessories: Real Red Striped Grosgrain Ribbon (119768), SNAIL (104332), Stampin' Dimensionals (104430), Glue Dots (103683), White Embossing Powder (109132), Dazzling Diamonds (102023)

  • Tools: 2 ½ Circle Punch (120906), Build A Cupcake Punch (121807) Paper Crimper Tool (101618), Heat Tool (100005)
Cardstock Dimensions for this Project
  • Pink Pirouette
    • 8.5 x 5.5 for card base
  • Whisper White
    • Scrap for punched circle
  • Soft Suede
    • Strip for cupcake bottom
  • Glimmer Paper
    • Scrap for punched cherry
Technique Directions
  1. Using a small container mix together equal parts of White Embossing Powder and Dazzling Diamonds. Be sure to mix them well.
  2. Take punched out "top" of cupcake and apply Versamark. Cover with embossing powder/dazzling diamonds mixture and tap off excess. Heat and set with Heat Tool.
  3. Allow to cool and repeat to build up frosting.


Finishing Touches
  1. Fold cardbase in half.
  2. Take piece of Soft Suede cardstock and run through paper crimmer. Punch out bottom of cupcake.
  3. Punch cherry out of glimmer paper.
  4. Punch circle out of Whisper White and stamp greeting towards bottom in Red Classic.
  5. Attach bottom of cupcake to circle using SNAIL, attach top using a Stampin' Dimensional and the cherry with a glue dot.
  6. Add ribbon to card base using SNAIL. Cut off at left edge and cut on angle towards the right hand edge.
  7. Add circle with cupcake using Stampin' Dimensionals.

Wednesday, February 2, 2011

Package Valentine's Day Chocolates in this Love Fancy Favor Box!


One of the most popular sets in the new Occasions Mini is the cute and fun Valentine's Defined (W121941/C123057) set. While this is a great set for Valentine's Day, it is a good set for scrapbooking, anniversary cards and more! This box features the "love you" greeting from the set which fits perfectly in the small oval punch, as well as a new must-have item, Red Glimmer Paper (121790) which is so sparkly and the glitter stays put!!!

Stampin' Up Supply List
  • Stamps: Valentine's Defined (W121941/C123057)
  • Ink: Real Red Classic (103133)
  • Paper: Real Red (102482), Pink Pirouette Cardstock (111351), Love Patterns Designer Series Paper (124156), Red Glimmer Paper (121790)
  • Accessories: SNAIL (104332), Stampin' Dimensionals (104430), Sticky Strip (104294)
  • Tools: Big Shot Die Cutting System (113439), Fancy Favor Box Die (115965), Tasteful Trim Die (120893), Small Oval Punch (119863), Large Oval Punch (119855), Scallop Oval Punch (119856)
Step by Step Directions
  1. Cut out Fancy Favor Box out of Love Patterns Designer Series Paper using Big Shot. Assemble box using Sticky Strip.
  2. Cut out handle for box using Tasteful trim die. Add handle to the box on the inside using Sticky Strip.
  3. Stamp "love you" in Real Red on Whisper White. Punch out with small oval punch.
  4. Punch large oval out of glimmer paper, add greeting on top with SNAIL.
  5. Punch scallop oval out of Pink Pirouette and attach other ovals on with SNAIL.
  6. Add to the box with Stampin' Dimensionals.
If you'd like to make cute valentine's favors like this one, you can schedule a valentine's themed class where I'll come to you! Email me for available dates :)

Check back tomorrow for cards stamped with the Valentine Defined stamp set!

Monday, January 10, 2011

Covering Chipboard with Designer Series Paper


Chipboard is one of those items that most people just don't know on earth they'd do with it. This week we'll cover it with Designer Series Paper and learn a few tips and tricks for making it work for you.


Stampin' Up Supply List

  • Stamps: Three Little Words (113254)
  • Ink: Early Espresso (119670), Pretty in Pink (101301)
  • Paper: Real Red (102482), Whisper White (100730), Early Espresso Cardstock(119686), Designer Series Paper Patterns Love (124156), Red Glimmer Paper (121790)
  • Accessories: On Board Mix & Match Chipboard (119240), SNAIL (104332), Stampin' Dimensionals (104430),Sponge (101610), Distressing Kit (118762), Multipurpose Liquid Glue (110755), Glue Dots (103683)
  • Tools: Big Shot Die Cutting System (113439), Scallop Square Duo (120903), Perfect Polkadots Embossing Folder (117335), Small Heart Punch (117193), Paper Snips (103579)
Cardstock Dimensions for this Project


  • Real Red

    • 8.5 x 5.5 for card base

  • Early Espresso

    • 4 x 5.25 for embossed panel

  • Whisper White

    • 4 x 4 for scallop square

  • Designer Series Paper

    • 3.5 x 3.5 to cover chipboard heart

  • Glimmer Paper

    • Scrap for punched heart
Technique Directions
  1. Take chipboard and cover top with Tombo Mono Glue
  2. Apply paper on top and set aside and allow to dry
  3. Once dry take your paper snips and trim off excess paper.

Tips & Tricks
  • Sand off extra pieces with sanding block, for smaller pieces use the files from the distressing kit. These are very handy when you are dealing with the inside of a letter!
  • To "finish" edges, gently sponge with coordinating ink. On this project the edges are inked with Pretty in Pink ink.
Finishing Touches

  1. Fold cardbase in half.
  2. Emboss Early Espresso piece in Big Shot using Polkadot Embossing Folder. Attach to card base using SNAIL.
  3. Run Whisper White piece through Big Shot using Scallop Square.
  4. Stamp greeting towards bottom using Early Espresso Ink. Attach square to cardbase using SNAIL.
  5. Attach finished chipboard heart to scallop square using glue dots.
  6. Punch heart from glimmer paper and attach with a glue dot.

Saturday, January 8, 2011

Key to My Heart Card


The Occasions Mini catalog is here! There's so many great new products that you will absolutely love. This card features a new must-have stamp set, You're a Gem (W122268/C122270) that is packed full of great sayings. The key is also a new offering – Trinket Keys (121892) which come in a package of four different keys. Don't you love how these two items go together so perfectly for a great valentine's or anniversary card?


If you are on my mailing list, you should be receiving the mini catalog in the mail shortly, and if not, let me know and I'll get one in the mail to you!


Stampin' Up Supply List
  • Stamps: You're a Gem (W122268/C122270)
  • Ink: Cherry Cobbler (119669)
  • Paper: Cherry Cobbler (119685), Very Vanilla (101650), Basic Black (121045)
  • Accessories: Basic Black Striped Grosgrain Ribbon (115615), Trinket Keys (121892) Linen Thread (104199), Mini Glue Dots (106683), SNAIL (104332), Stampin' Dimensionals (104430)
  • Tools: Big Shot Die Cutting System (113439), Vintage Wall Paper Embossing Folder (120175), Scalloped Heart of Heart Sizzlit (117332), Full Heart Punch (119883)
Step by Step Directions
  1. Cut Basic Black to 5.5 x 8.5 and fold in half.
  2. Cut Very Vanilla to 5.25 x 4 and run through Big Shot with Vintage Wallpaper Folder.
  3. Stamp greeting in Cherry Cobbler on a scrap of Very Vanilla, punch out with Full Heart Punch and set aside.
  4. Run piece of Cherry Cobbler through Big Shot using Heart Embosslit. Attach punched heart to Big Shot one using SNAIL.
  5. Tuck left edge of ribbon under and attach using SNAIL. Carefully attach ribbon to embossed panel using glue dots to about the half way point.
  6. Take a piece of linen thread and tie a bow, and include the key.
  7. Affix the rest of the ribbon using glue dots, trim edge on an angle and leave it so it over hangs.
  8. Attach embossed panel to card base using SNAIL.
  9. Attach heart to finished card using Stampin' Dimensionals
If you'd like to see some of the Occasion Mini products in action, contact me to schedule a private stamping class today!

Sunday, November 28, 2010

November 30th Christmas Stamp-a-stack: 3 Spots remaining!

Christmas Card Stamp-a-Stack – 3 SPOTS LEFT!
Tuesday November 30th, 7:30pm – 9:30pm

There is still plenty of time to make your Christmas cards. At this class you will make 12 cards (3 each of 4 designs).


COST: $30 for class
Bring a friend I have never met and class this class for $20!
Place an order of $50 that day, get the class half price
Place an order of $75 that day, get the class for FREE
(Demonstrators can attend for $20)


Tuesday, November 9, 2010

Technique of the Week: Embossed Vellum


This week's technique features embossing Vellum Cardstock with the Big Shot.

Stampin' Up Supply List
  • Stamps: Butterfly Prints (W121049/C120738)
  • Ink: Blushing Bride (119786), Concord Crush (119785), Peach Parfait (119783) Classic Ink
  • Paper: Whisper White (100730), Concord Crush (119792) Cardstock, Cardstock Vellum (101856)
  • Accessories: Concord Crush Polystitched Ribbon (119265), Basic Rhinestones (119246), SNAIL (104332), Stampin' Dimensionals (104430), Mini Glue Dots (103683)
  • Tools: Big Shot (113439), Vintage Wallpaper Embossing Folder (120175), Butterfly Punch (119848)
Cardstock Dimensions for this Project
  • Concord Crush
    • 8.5 x 5.5
  • Cardstock Velllum
    • 5.25 x 4
  • Whisper White
    • Scrap for stamped butterfly
Technique Directions
  1. Run cardstock Vellum through Big Shot using desired embossing folder.
  2. Attach to project using Mini Glue Dots. You want to place the glue dots where they will be covered up by accessories or stamped images.
Notes:
  • With this technique, you want to make sure you use Cardstock Vellum. It is heavier and runs through the Big Shot without tearing. Lighter weight Vellum will tear as it is embossed.
  • This is a great way to add texture in a unique way.
Finishing Touches
  1. Take card base and fold in half.
  2. Emboss vellum and attach using glue dots as outlined above.
  3. Attach ribbon to card by tucking edges of ribbon underneath edge and ensuring they are covered up on the flip side.
  4. Stamp a butterfly on Whisper White - one each of Blushing Bride, Concord Crush and Peach Parfait – and punch out with Butterfly Punch and put aside. Attach to card base using Stampin' Dimensionals.
  5. Top off each butterfly with a Basic Rhinestone.
Cards that wow don't have to be complicated or time consuming. Simple and elegant techniques like this one can take things to the next level without a lot of extra steps! Try it today :)

Monday, October 11, 2010

Day of Gratitude Card Using Emboss Resist Technique


SP1 

Emboss Resist, enables you to get a wide variety of looks with some basic heat embossing, sponges and classic ink.


Stampin' Up Supply List

  • Stamps: Day of Gratitude (W120835/C121148)
  • Ink: Rich Razzleberry (115658), Pumpkin Pie (105216), Versamark (102283)
  • Paper: Very Vanilla Cardstock (101650), Rich Razzleberry (115316)
  • Accessories: Antique Brads (117273), Rich Razzleberry 1/8 Taffeta Ribbon (119259), Stampin Sponges (101610), Champagne Mist Shimmer Paint (116806), Gold Embossing Powder (109129), SNAIL (104332), Stampin' Dimensionals (104430)
  • Tools: Big Shot Die Cutting System (113439), Petals a Plenty Textured Impressions Embossing Folder (116824), Heat Tool(100005), Paper Snips (103579), Paper Piercer (161631)
  • Other: Spray Bottle, Rubbing Alcohol

Cardstock Dimensions for this Project

  • Rich Razzleberry
    • Card Base: 4.25 x 4.25
    • Embossed Piece: 2.75 x 4.25
  • Very Vanilla
    • Piece for embossing
Technique Directions

  1. Emboss medallion image from Day of Gratitude with Gold Embossing Powder on Very Vanilla cardstock.
  2. Sponge Rich Razzleberry classic around the edge, and Pumpkin Pie in the centre of the image.
  3. Take a Kleenex to wipe any extra ink off embossed detail.
Bonus Techniques – Shimmer Paint Spray

  1. Place rubbing alcohol in a small spray bottle.
  2. Add 5-6 drops of Shimmer Paint and shake well.
  3. Spray embossed panel with shimmer paint mixture.
Finishing Touches

  1. Take card base and fold in half.
  2. On bottom right corner stamp greeting as shown in Rich Razzleberry.
  3. Run 2.75 x 4.25 Rich Razzleberry panel through Big Shot with Petals A Plenty Embossing Folder. Spray with shimmer paint mixture and set aside to dry.
  4. Cut out emboss resist medallion with paper snips and set antique brad in the middle.
  5. Attach embossed piece to the card base with SNAIL.
  6. Affix Rich Razzleberry ribbon along the seam under the embossed piece with SNAIL, cut off edges so they are square with the edge.
  7. Attach medallion with Stampin' Dimensionals as shown.
Emboss resist offers you the ability to create dramatically different looks depending on the embossing powder and ink you use. With a different color combination, this stamp set can easily be used for multiple seasons.

Saturday, October 9, 2010

Stamp Set of the Month Class - Contempo Christmas

Contempo Christmas - Stamp Set of the Month Class
Tuesday, October 26th - 7:30pm - 9:00pm
RSVP by October 12th


Each month, a different featured stamp set is used to make 4 beautiful cards. For the month of October, we will be using the Contempo Christmas stamp set. You will also get ½ pack of Jolly Holiday Designer Paper.


COST: Pay $35 for clear-mount* OR $40 for wood mount stamp set
          Pay $20 for the class only

*If you do not already own a clear block (D), I can order one for you at an additional cost of $11.50 + s/h & taxes

Please RSVP before October 12th to ensure that you receive your stamp set on time for the class. Payment must also be received by October 12th.

Accepted methods of payment: Cheque, cash, email transfer or Paypal (a $2 fee applies)


Email me to register before Tuesday, October 12th!


Saturday, September 11, 2010

Technique of the Week: Wax Paper Resist with Embossing Folders


Get out your iron and use it for something fun this week! Using an embossing folder for the Big Shot, your iron and some wax paper, you'll create a one of a kind background for your projects. This card features the new Spider Web Textured Impressions Embossing Folder (120889) from the Holiday Mini Catalogue.

Stampin' Up Supply List

  • Stamps: Wicked Cool (W118738/C120600)
  • Ink: Basic Black (101179), Elegant Eggplant (105210), Old Olive (102277)
  • Paper: Elegant Eggplant (105126), Glossy White (102599), Whisper White (100730), Basic Black (121045)
  • Accessories: Black Flourish Designer Jewels (120987), SNAIL (104332), Stampin' Dimensionals (104430)
  • Tools: Big Shot Machine (113439), Spider Web Textured Impressions Embossing Folder(120889), 2 x 1 3/8 XL Oval (119859), Modern Label Punch (119849), Bitty Bat(119279), Stampin' Sponges (101610)
  • Other: Towel, Household Iron, Wax Paper
Cardstock Dimensions for this Project


  • Elegant Eggplant
    • Card Base: 5.5 x 8.5

  • Glossy White
    • Mat: 4 x 5.25
  • Scrap of Whisper White, Basic Black, and Elegant Eggplant for punched shapes

Technique Directions

  1. Emboss a piece of wax paper using the Big Shot and the Spider Web Embossing Folder.
  2. Sandwich the embossed piece of wax paper between two pieces of Glossy White cardstock. Cover with a thin towel and then iron on a dry setting that is relatively hot like the one for Cotton. Gently iron until the wax transfers from the wax paper to the cardstock. You will end up with two pieces that have wax on them.
  3. Take your brayer and cover the glossy cardstock as desired, the wax part will resist the ink. For this project, the image was brayered with Basic Black and then lightly sponged with Elegant Eggplant and Rich Razzleberry.
  4. The finished panel will look like this:


Finishing Touches

  1. Fold card base in half.
  2. Attach finished glossy cardstock panel once brayered and sponged to card base using SNAIL.
  3. Using transfer sheet and following directions in the package, place Designer Jewels as shown. For this project, the main flourish image was cut in half and then applied.
  4. Stamp Spooky in Old Olive classic ink on Whisper White and then punch out with Modern Label punch.
  5. Punch out a XL Oval of Elegant Eggplant and then crinkle up. Smooth it out and attach greeting piece using SNAIL.
  6. Cut two separate jewels from Designer Jewel package and add to each end of the greeting. Affix to the card using Stampin' Dimensionals.
  7. Punch bat from Basic Black and attach with Stampin' Dimensionals as shown.
This technique can be easily adapted for any embossing folder to create a distinctive background or accent for your papercrafting projects.

To shop my Stampin' Up! store for these products, click HERE!

Wednesday, June 30, 2010

Teacher's Gift and Card

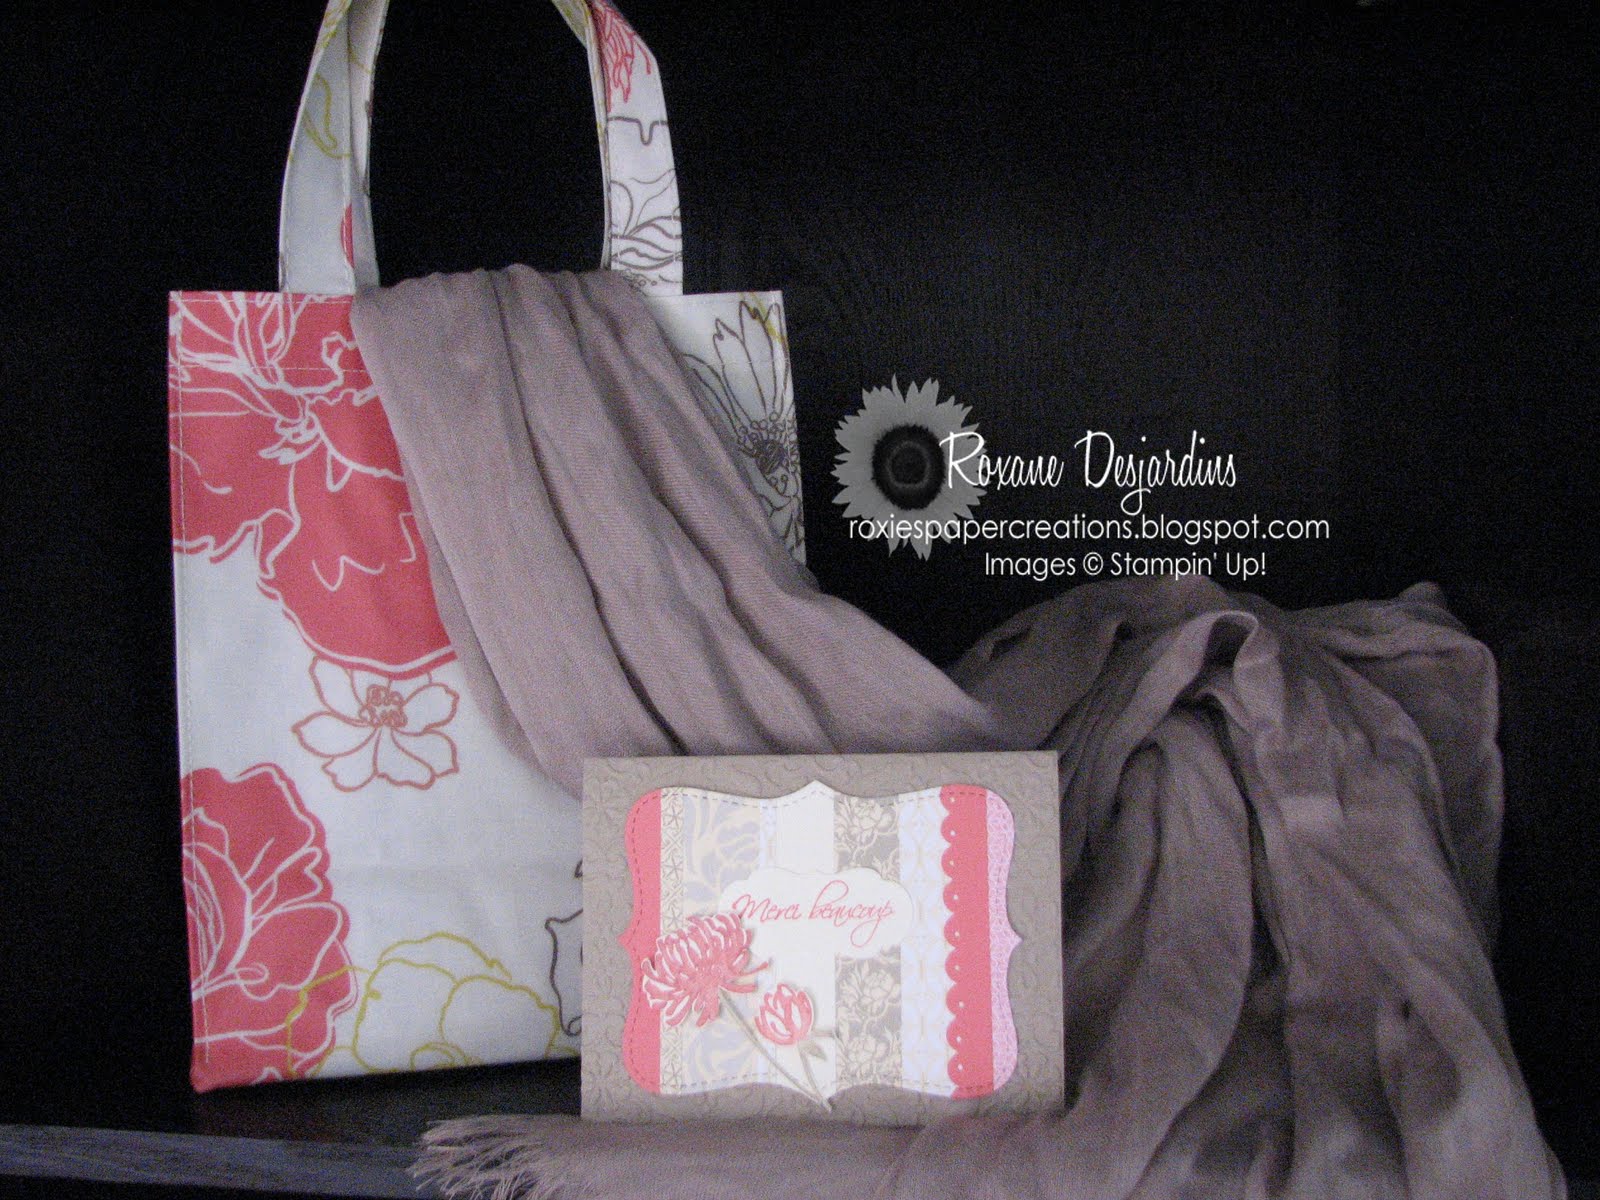
Today I want to show you the gift we got for Owen's teacher. I know that I have posted a similar card HERE, but I wanted to show you how you can get inspiration for colors in different places such as magazines, home decor, or in this case, fabric.


I found this beautiful silk scarf, which I knew Owen's teacher would absolutely love, and wanted to purchase a cute gift bag to put it in. The color of the scarf is very similar to Stampin' Up! Kraft (newly named Crumb Cake). While walking around Indigo, I saw this lunch bag that was Very Vanilla with Cameo Coral, Crumb Cake and So Saffron. 
On the way home, I was already thinking of what I would do for the card.   I remembered that I had some retired SU designer paper called Walk in the Park that had a patterned sheet of Cameo Coral.  I also thought that the Kind & Caring Thoughts stamp set (2009-2010 Hostess level 3 set) would be perfect for it!  Here is the card close up...

Supplies
Stamps: Kind & Caring Thoughts (in French)
Ink: Cameo Coral
Cardstock: Crumb Cake, Whisper White
Paper: Bella Bleu, Walk in the Park (retired)
Accessories: Big Shot, Vintage Wallpaper embossing folder (available July 1st), Top Note Bigz Die, dimensionals, Lots of Tags sizzlits, Scallop edge punch, 1/16" hand held punch, paper cutter, snail adhesive

I apologise for the quality of the pictures..I still need to learn about lighting....apparently *wink*

So what do you think!? Next time you are looking for inspiration, pick up a magazine, look at the art that is in your home or go into your closet.  I bet you will be inspired : )

Wishing you all a great day!


P.S. Don't forget that today is the last day to order from the 2009-2010 Idea Book & Catalogue.  I will be placing an order later this evening.  If there are some retiring stamps sets or accessories that you want, get them before they are gone forever! Email me your order before 6pm (EST).  I can deliver to anywhere in Canada.  To see the Last Chance lists, click here and here.  To Shop Now, click HERE.


Friday, June 25, 2010

Seasons of Friendship Class - Spaces Still Available!

If you have missed the deadline to sign up for this class, no worries!  I have 2 spots left and you can still register : )
Choose the class only option for $20 or the class with the Seasons of Friendship stamp set for $45.

Here are 2 of the cards we will be making;


I also have 3 spots left for the Last Chance Card Class.  See all the details HERE!

Don't forget, only 5 days left to shop from the retiring list of Stamps, Accessories & Decor Elements. Click HERE to shop now!

Have a great weekend everyone!


Monday, June 21, 2010

Last Chance Card Class Samples

Good Monday to all! I hope that you have all had a fabulous weekend celebrating the wonderful dads and husbands in your lives : )

Today I am sharing some samples from my Last Chance Class.  At this class, we will be using stamps sets and accessories that will be retiring on June 30th. 

Please note that this class has been rescheduled for Tuesday, June 29th from 7pm to 9pm.  There are still 3 spots left so if you live in the Ottawa area, email me to sign up.  The cost is $15 or FREE with a $25 order.  We would love to have you stamp with us!

Here are 2 of the cards we'll be making;


Retiring products used:
Congrats Card:
Four Squares stamp set
Bermuda Bay cardstock & Stampin' write marker

Welcome, little one Card:
Nursery Necessities stamp set
Striped Grosgrain ribbon in Old Olive and Bashful Blue
Real Red Polka Dot grosgrain ribbon
1/4 grosgrain ribbon in Bashful Blue & So Saffron
Brocade Blue cardstock
Jumbo Alphabet Wheel*
*sold out

Can't make it to the class but would like to order some retiring products!?  You still have 8 days! Click on Last Chance List on the right hand side to see what is still available. Then click on the SHOP ONLINE 24/7 on the right hand side of my blog and place your order.  You can also email me or call 613-800-2117 to place your order.  Place a $25 order or more and I will mail you the 5 completed cards : )


Sunday, June 13, 2010

"Good 'til the Last Scrap" Card Class Sample & Catalogue Pre-order

Hi folks!

I received my new 2010-2011 Idea Book & Catalogue in the mail on Friday and was inspired by one of the beautiful cards on the cover for one of my classes this week.  My "Good 'til the last scrap" class on Wednesday, June 16th will teach you how to use all of those designer paper and cardstock scraps.  We all know that we, papercrafters, have stashes of designer paper scraps or even full sheets that we have been hoarding! Time to put them to good use. : )

Supplies
Stamps: Kind and Caring Thoughts, Vintage Vogue
Cardstock: Kraft (newly renamed Crumb cake), Not Quite Navy, Very Vanilla
Ink: Not quite Navy
Accessories: Sizzix Big Shot die cutting machine, Top Note Bigz die, Lots of Tags sizzlit dies, Finial Press embossing folder, Scallop punch, glue stick, dimensionals, paper snips,

The new 2010-2011 Idea Book & catalogue is absolutely beautiful!  Stampin' Up! have really outdone themselves...again!  If you would like a copy of your own, here is how you can get one;

1 – Place an order of $50 or more from June 1st - June 30th and get a FREE copy
2 – Book a workshop and get a FREE copy
3 – Pay $5 and pick up your copy at my home OR pay $15 and I will ship one to your door! (anywhere in Canada )

This year's catalogue is a full 16 pages longer! Just think--16 additional pages filled with new and exciting products for you to enjoy!

Catalogues will be ready for delivery around Jul 1st.  Email me today to pre-order yours : )
_____________________________________________________________

I still have some spaces available for my "Good 'til the last scrap" class.  For all the details, click HERE.

Email me or call 613-800-2117 before Tuesday, June 15th to register!


Wishing you all a wonderful week! xo